The WordPress Quick Edit menu allows us to quickly modify certain object attributes without having to go into the full object Edit Screen. The Quick Edit menu uses javascript to display the edit interface, thereby saving us time and additional calls to our WordPress server.

The first step towards expanding our WordPress Quick Edit Menu is to add a custom column to our target Edit Screen. In this example tutorial, we will expand the Quick Edit menu for Post objects. Therefore, we start by adding a custom column to our Posts screen.
1. Add a Custom Column
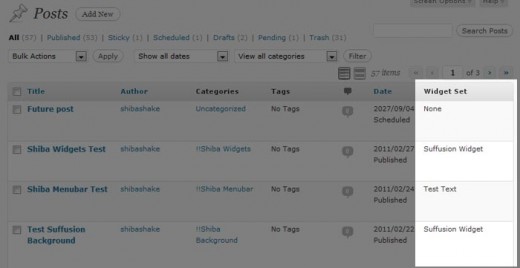
We add a custom column called Widget Set which shows some custom meta data associated with our Post objects.
// Add to our admin_init function
add_filter('manage_post_posts_columns', 'shiba_add_post_columns');

function shiba_add_post_columns($columns) {
	$columns['widget_set'] = 'Widget Set';
	return $columns;
}
The code above adds a new but empty column to our Posts screen.

To fill our new column with the relevant meta-data values, we use the manage_posts_custom_column action hook.
// Add to our admin_init function
add_action('manage_posts_custom_column', 'shiba_render_post_columns', 10, 2);

function shiba_render_post_columns($column_name, $id) {
	switch ($column_name) {
	case 'widget_set':
		// show widget set
		$widget_id = get_post_meta( $id, 'post_widget', TRUE);
		$widget_set = NULL;
		if ($widget_id)
			$widget_set = get_post($widget_id);
		if (is_object($widget_set)) echo $widget_set->post_title;
		else echo 'None';
		break;
	}
}
Line 2 – Add the manage_posts_custom_column action hook to our admin_init function.
Lines 5 to 6 – Check for our new custom column.
Lines 8 to 13 – Render our custom Post object meta-data values.

Now, our new column is filled with the relevant meta-data values.
2. Expand the WordPress Quick Edit Menu
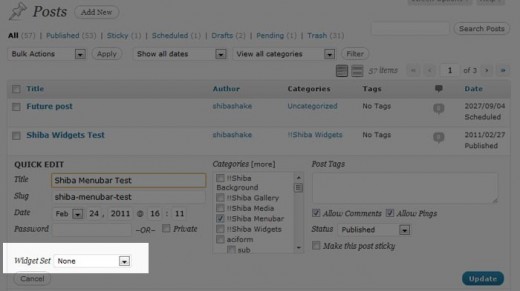
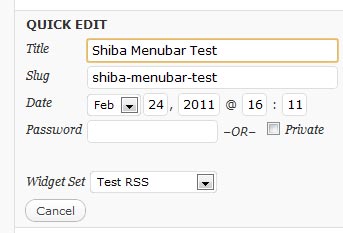
After adding our custom column, we are ready to expand our Post Quick Edit menu using the quick_edit_custom_box action hook.
Note – The quick_edit_custom_box action hook will not fire unless there are custom columns present. That is why we started by adding a custom column.
// Add to our admin_init function
add_action('quick_edit_custom_box',  'shiba_add_quick_edit', 10, 2);

function shiba_add_quick_edit($column_name, $post_type) {
	if ($column_name != 'widget_set') return;
	?>
    <fieldset class="inline-edit-col-left">
	<div class="inline-edit-col">
		<span class="title">Widget Set</span>
		<input type="hidden" name="shiba_widget_set_noncename" id="shiba_widget_set_noncename" value="" />
		<?php // Get all widget sets
			$widget_sets = get_posts( array( 'post_type' => 'widget_set',
							'numberposts' => -1,
							'post_status' => 'publish') );
		?>
		<select name='post_widget_set' id='post_widget_set'>
			<option class='widget-option' value='0'>None</option>
			<?php
			foreach ($widget_sets as $widget_set) {
				echo "<option class='widget-option' value='{$widget_set->ID}'>{$widget_set->post_title}</option>\n";
			}
		        ?>
		</select>
	</div>
    </fieldset>
	<?php
}
Line 5 – Only render our Quick Edit extension on the relevant screen.
Lines 7 to 25 – Render our custom drop-down menu for selecting widget sets.

3. Save Custom Quick Edit Data
We save our new quick edit menu data in the same way that we save new custom meta-box data – through the save_post action hook. The save_post function below was adapted from the example found on WordPress.org.
// Add to our admin_init function
add_action('save_post', 'shiba_save_quick_edit_data');

function shiba_save_quick_edit_data($post_id) {
	// verify if this is an auto save routine. If it is our form has not been submitted, so we dont want
	// to do anything
	if ( defined('DOING_AUTOSAVE') && DOING_AUTOSAVE )
		return $post_id;
	// Check permissions
	if ( 'page' == $_POST['post_type'] ) {
		if ( !current_user_can( 'edit_page', $post_id ) )
			return $post_id;
	} else {
		if ( !current_user_can( 'edit_post', $post_id ) )
		return $post_id;
	}
	// OK, we're authenticated: we need to find and save the data
	$post = get_post($post_id);
	if (isset($_POST['post_widget_set']) && ($post->post_type != 'revision')) {
		$widget_set_id = esc_attr($_POST['post_widget_set']);
		if ($widget_set_id)
			update_post_meta( $post_id, 'post_widget', $widget_set_id);
		else
			delete_post_meta( $post_id, 'post_widget');
	}
	return $widget_set_id;
}
4. Update the Quick Edit Menu with Javascript
Now comes the really fun part – notice that while our new custom input shows up in the Quick Edit menu, it is not properly updated to show which ‘widget_set‘ the current Post object is set to. I.e., our widget set meta-data is not getting through to our custom Quick Edit menu.
The set_inline_widget_set javascript function below updates our Quick Edit menu with the relevant meta-data.
// Add to our admin_init function
add_action('admin_footer', 'shiba_quick_edit_javascript');

function shiba_quick_edit_javascript() {
	global $current_screen;
	if (($current_screen->id != 'edit-post') || ($current_screen->post_type != 'post')) return;

	?>
	<script type="text/javascript">
	<!--
	function set_inline_widget_set(widgetSet, nonce) {
		// revert Quick Edit menu so that it refreshes properly
		inlineEditPost.revert();
		var widgetInput = document.getElementById('post_widget_set');
		var nonceInput = document.getElementById('shiba_widget_set_noncename');
		nonceInput.value = nonce;
		// check option manually
		for (i = 0; i < widgetInput.options.length; i++) {
			if (widgetInput.options[i].value == widgetSet) {
				widgetInput.options[i].setAttribute("selected", "selected");
			} else { widgetInput.options[i].removeAttribute("selected"); }
		}
	}
	//-->
	</script>
	<?php
}
Lines 5 to 6 – Only add the javascript quick edit function to the Posts screen.
Line 13 – Make sure that Quick Edit menu is closed. The revert function (defined in inline-edit-post.js) ensures that our Quick Edit custom inputs are properly updated when we switch Post objects.
Lines 15 to 16 – Set nonce value for our custom inputs. If we want, we can expand our save_post function to do a nonce check.
Lines 18 to 22 – Set the proper widget set option on our custom Quick Edit drop-down menu.
5. Link Javascript to the Quick Edit Link
Finally, we want to link our set_inline_widget_set javascript function to the Quick Edit link so that it will update all our custom input values when a Quick Edit link is clicked.
We do this by hooking into the post_row_actions filter. Post object link actions are originally defined in the WP_Posts_List_Table class.
// Add to our admin_init function
add_filter('post_row_actions', 'shiba_expand_quick_edit_link', 10, 2);
function shiba_expand_quick_edit_link($actions, $post) {
global $current_screen;
if (($current_screen->id != 'edit-post') || ($current_screen->post_type != 'post')) return $actions;
$nonce = wp_create_nonce( 'shiba_widget_set'.$post->ID);
$widget_id = get_post_meta( $post->ID, 'post_widget', TRUE);
$actions['inline hide-if-no-js'] = '<a href="#" class="editinline" title="';
$actions['inline hide-if-no-js'] .= esc_attr( __( 'Edit this item inline' ) ) . '" ';
$actions['inline hide-if-no-js'] .= " onclick=\"set_inline_widget_set('{$widget_id}', '{$nonce}')\">";
$actions['inline hide-if-no-js'] .= __( 'Quick Edit' );
$actions['inline hide-if-no-js'] .= '</a>';
return $actions;
}

Lines 5 to 6 – Only expand Quick Edit links for the Posts screen.
Lines 8 to 9 – Get nonce and other custom input values associated with the current post.
Line 12 – Add the onclick event to our Quick Edit link and associate it to our set_inline_widget_set javascript function.
Related Quick Edit Menu Source Files
- Javascript Quick Edit file for post objects.
- inline_edit – Renders the HTML Quick Edit menu form.
- get_inline_data – Generates data that is later used by the javascript inline editor for posts and pages.
- Quick Edit link action.
In this listing :
// Add to our admin_init function
add_action('manage_posts_custom_column', 'shiba_render_post_columns', 10, 2);

function shiba_render_post_columns($column_name, $id) {
	switch ($column_name) {
	case 'widget_set':
		// show widget set
		$widget_id = get_post_meta( $id, 'post_widget', TRUE);
		$widget_set = NULL;
		if ($widget_id)
			$widget_set = get_post($widget_id);
		if (is_object($widget_set)) echo $widget_set->post_title;
		else echo 'None';
		break;
	}
}
why are you printing post title instead of custom field value? this line should print custom field value, isn’t it?
and this code isn’t work, it’s return NULL though there is a value and it’s print the default value ‘NONE’.
But if i set the default value to print
$widget_id(line 13) it’s gone right, but the rest (that haven’t a value in the custom field) didn’t print anything.a little help and explanation would be appreciated.
In the example, widget_set is my own custom post type. You would of course modify it to use whatever object or meta_data that is relevant in your situation.
http://codex.wordpress.org/Post_Types#Custom_Types
Hey, awesome post, but you got me a little confused now with the custom post type. So, when using this with regular posts, should I replace every instance of ‘widget_set’ with ‘post’? And where would I put my own custom field ‘website_url’ in this case (which is just a plain old text field, by the way)?
Thank you for clarifying for me!
Awesome post!
I have the same problem (however for post tags) as mentioned already that I would like to retrieve the present settings and mark them with selected=”selected”. Is there any way to get the present ID of the element in that particular row?
Thanks!
I have to reply to my own comment. I managed to get this working. For taxonomy editing you need to call the JS inlineEditTax.revert(); Thanks again, saved me lots of work!
Hi, your code is really magic but i’m not a php expert developer, is there a way to insert custom fields instead the ID post?
I need to show the 3 custom field options into the “option” form.
I’m using this:
 'lotes',
 'numberposts' => -1,
 'post_status' => 'publish') );
 ?>
Inside the form:
<?php
foreach ($estatus_columns as $estatus_column) {
echo "ID}'>{$estatus_column->post_title}\n";
}
?>
I’m trying to do this with no success:
Inside the form:
<?php
foreach ($estatus_columns as $estatus_column) {
echo "estatus}'>. get('estatus') .\n";
}
?>
Thank you in advance.
Very interesting work, I was wondering if there is a way to remove items from quick edit, for example the categories box?
There is no easy way that I know of. Here is the inline_edit function for posts. There may be some place to hook into to stop certain input elements from rendering.
http://phpxref.ftwr.co.uk/wordpress/nav.html?wp-admin/includes/class-wp-posts-list-table.php.source.html#l689
HI Shiba,
Is there a way to add desired columns such as postmeta field to quick edit
option without creating columns? I did this by calling method but i could’t make it work since those values are not saving could you walk through it once please guide me to achieve this.
Hey I found solution we can create columns as many as we want without creating columns by calling foreign method to quick edit save anyways –thanks
as a heads up if you are using this on a hierarchical post type, then you must change post_row_actions to page_row_actions. got stuck on that for a while. and to touch back on my old comment about setting the thumbnail from the edit.php screen, i was able to accomplish this except that the new image wouldn’t fade in. i couldn’t find any way to hook onto the completion of the ajax save. still looking for the appropriate callback.
I have to get the current post meta inside the function and update the data with conditions of new and existing data. But seems like get_post_meta is not working. I tried this: get_post_meta($post_id, ‘_vm’, TRUE) while there is some existing data with meta key _vm but. It outputs nothing. It works good on other function. I need quick help.
Not sure why. It could be an issue with the wrong $post_id or that the meta key starts with an underscore. I would print out the $post_id to make sure it is the post that I want. If that is not the issue, I would try using a different meta key.
Anyway, let us know what works out.
Sorry for late reply. That doesn’t work. The post id and meta key is accurate. I tried printing them and also tried with some other meta before doing the comment. It looks like the get_post_meta function doesn’t work inside the function for me. If you have time you may try. I used same code and data to get the meta data on edit post page and other places and that works fine.
Im struggling to follow this. the first bit add a custom column Widget Set to the admin I cant follow as you dont illustrate which file is needed to be edited. It would be easier if you pointed out edit the /wp-admin/admin.php file (or what ever file it is)
Im trying to just add a new field in the pages edit menu so that it will just display the page file name eg left-handed-widgets.html. ultimatly I just want to export a list of the page file names my site has. but dont want it in xml. just want a text file or CSV. cant find a plugin to to this anywhere. Ijust need to record on a table each page file name and its inherant google page rank. So I can get a at the glance view of which pages need a bit of sculpting.
does anyone know if there is a plugin that will do this. I could follow the instructions if didnt have to second guess while file is being edited. or is that just the arrogance of the person writing the tutorial “if your wanting to edit this code, then you should know what file we are using, else get lost” how much extra effort does it take to just put in a step that says ‘open wp-admin/edit-xyz.php’ .
In general, you do not want to edit WordPress core files.
The best ways to add in new functionality is through a child theme or through a plugin. Some people edit their current theme file for a short term solution.
There are a variety of articles out there on child themes and how to write a plugin. I would start with the WordPress Codex. I also have an example plugin that you can use –
http://shibashake.com/wordpress-theme/wordpress-example-plugin
I can understand your frustration with WP programming, but striking out at others is perhaps not the best way to get questions answered.
Great! I had been looking for this since a long time! I needed a way to set my custom fields without opening up the post edit screen, but couldn’t find one. And then I came across this post when I was reading your http://shibashake.com/wordpress-theme/custom-post-type-permalinks post.
Thanks! You rock!
-Rutwick
nm. i must have messed something up while trying to expand it to my own purposes. sweet.