After a long-hiatus, I once again caught the web-bug and decided to get back to experimenting with my websites. My first project was to migrate my sites from Media Temple over to Amazon AWS. The key reasons for this –
- Much much better price point. I would be paying about a third or less of what I am paying now.
- Superb flexibility and stability. I can easily experiment, create mirror sites, and create staging sites to launch large or even small WordPress updates.
- Greater control of the server and its configuration.
- Cool learning experience.
I was excited to get rid of cPanel and set up the server myself. AWS is a great platform for this, because it offers great flexibility in terms of quickly setting up multiple instances and just as quickly shutting them down if I mess up or if they turn out to be not the right fit.
In short, the cost of experimentation on Amazon AWS is very low.
Remember this while you start to setup your server. Even if you make choices that later you want to change, you can very easily just set up a new server, at very little cost.
1. Configuring Your Amazon AWS Server
For my AWS server, I decided to go with a LAMP stack (Linux, Apache, MySQL, PHP). This was what I was familiar with in my previous hosting sites, and it seemed like a good place to start.
a) Operating System
I chose Ubuntu as my Linux OS for a variety of reasons that is well-captured here. I pick the ARM option here, which I will explain in the next step. Now that I have played with this setup for a couple of months, I am quite happy with the amount of good documentation that is available for Ubuntu as well as on its general ease of use.

b) Instance Type
The next big question is what type of instance to use. Amazon has a very large selection of instance types. The type you choose will depend primarily on the size of your site (i.e. how much traffic you get) and pricing.
Be aware that if you are following tutorials to set up your website, they may suggest using a particular instance type that was probably new when the tutorial was written, but Amazon may be offering newer instance types now, at better price points. After some research, I decided to go with the t4g family. It performs well, is heat efficient, environmentally friendly, and Amazon is offering it at a superb price. Once you are happy with your setup, you can also purchase a multi-year savings plan with Amazon at very low rates. Note that the t4g series in only available for ARM operating systems, so if need be, go back to the previous step and pick the ARM option.
My sites do not get a large amount of traffic and I set them up with Cloudfront for caching, so I went with t4g.small. Again, remember that these choices are not set in stone. If later you decide on a different configuration, you can quickly launch a new instance and set up another LAMP stack. The whole process is surprisingly quick and painless.
c) Disk Size
When writing this article, the default disk or storage size for my server is 8 GiB. This is sufficient for perhaps two WordPress installations depending on the amount of media that you have. For anything more than that, you may want to go with a larger disk size. If you are migrating a site, it may be useful to check your current server to see how much disk space you are using.
If you end up needing more disk space, you can expand the storage size on your current instance, without any server downtime. No worries at this time, but here are some detailed instructions on how to do this.
2. Launching Your Amazon AWS Server
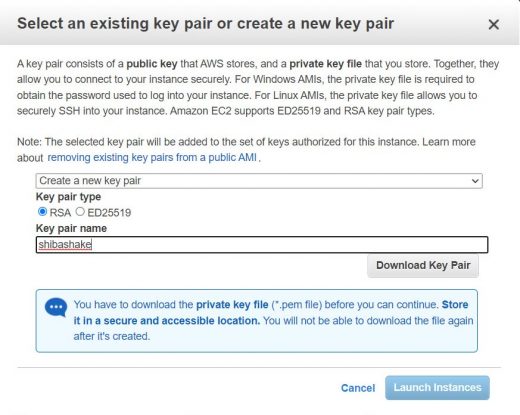
When you choose to launch your server instance, there will be a pop-up asking you about key-pairs. Choose create new key pair, make sure to click on “Download Key Pair”, and then launch your new server!
Congratulations, you have successfully made a new server that you can now start to interact with.
3. Connecting with Your Amazon AWS Server
Now, we focus on setting up an SSH connection so that we can log into our new instance and start setting up our server. When we launched our server, we created a key pair and then downloaded the key. Now we will use it to set up our SSH connection. I use PuTTY, so I follow this tutorial to get the PuTTY key, and set up my PuTTY session.
After following the instructions above I can now log in to my instance with SSH. Note that my Host Name is set up as ubuntu@ec2-00-000-000-000.compute-1.amazonaws.com, where ec2-blah is the public name of my newly launched instance. I can get this name by going to my AWS EC2 console. After setting up your new instance configuration on PuTTY, make sure to save it so that you can use it to easily connect in the future.
When you first connect using PuTTY, there will be a PuTTY security alert pop-up. I just click Yes here, to store the key in PuTTY’s cache.

If you did not download or cannot locate your key-pair file, do not worry. You can create a new key-pair from your AWS EC2 console by following the instructions here. This general article on key-pairs also has a bunch of useful links on creating and manipulating key-pairs.
4. Installing Apache on AWS EC2
To install my LAMP stack on my Amazon EC2 instance, I mostly follow this tutorial from Digital Ocean. There are some great Ubuntu tutorials on this site.
I will be running many commands that require super-user status so I switch to root by doing:
$ sudo su
Alternatively I can add sudo in front of all my commands. I start with:
$ sudo apt update
$ sudo apt upgrade
sudo apt update will refresh the list of available packages.
sudo apt upgrade will upgrade all installed packages.
Now, I am ready to install Apache.
$ sudo apt install apache2
We can check the status of our Apache server by doing:
$ systemctl status apache2
Type ‘q’ to quit from the status screen.
We do not need to set ufw firewall rules because Amazon EC2 has their own firewall, which we can access on our AWS EC2 console.
$ sudo ufw status
Status: inactive
- Go to your EC2 console.
- Click on the Security tab.
- Click on the associated security groups link to edit it.
- Click on the Edit inbound rules button.
- There should already be an SSH rule in there. Click on the Add rule button.
- In the Type field of the new rule, select HTTP. In the Source field of the new rule select 0.0.0.0/0. This allows all inbound IPv4 traffic.
- Repeat the previous step but now in the the Source field of the new rule select ::/0. This allows all inbound IPv6 traffic.
- Repeat steps 6 and 7 but this time, set the Type field to HTTPS.


Now you can access your new Apache server by going to:
http://ec2-00-000-000-000.compute-1.amazonaws.com
This is the ec2 public address that you can get from your AWS EC2 console. You can also use the public IP address. Either should produce the Apache default page.

If we have our own domain name, we may want to set up a virtual server at this point. To do so, I follow step 5 of this tutorial.
$ sudo mkdir /var/www/you_domain
Don’t worry too much at this point about permissions and content because this is where we will set up our WordPress installation at the end of this tutorial.
$ sudo vi /etc/apache2/sites-available/your_domain.conf
Paste the following into your_domain.conf:
<VirtualHost *:80>
    ServerAdmin webmaster@localhost
    ServerName your_domain
    DocumentRoot /var/www/your_domain
</VirtualHost>

<Directory /var/www/your_domain>
        AllowOverride All
</Directory>
Save and quit then:
$ sudo a2ensite your_domain.conf

Enabling site your_domain.
To activate the new configuration, you need to run:
  systemctl reload apache2
Before restarting Apache, I want to make sure that my new configuration file is correct and will not stop my Apache server from reloading.
$ sudo apachectl configtest
Syntax OK
$ sudo systemctl reload apache2
For proper caching and security, we will also want to enable the headers module on our Apache server. We can do this by running the following command:
$ sudo a2enmod headers

Enabling module headers.
To activate the new configuration, you need to run:
  systemctl restart apache2

$ sudo systemctl restart apache2
Check if the module is now included by doing:
$ sudo a2query -m headers
Summary of some useful Apache server commands
systemctl stop apache2
systemctl start apache2
systemctl restart apache2 (does stop and start)
systemctl reload apache2
systemctl status apache2

a2enmod headers
a2dismod headers (removes the headers module)
a2query -m headers
a2query -m
5. Installing MySQL on AWS EC2
Now we are ready to install MySQL. We are about half way through.
$ sudo apt install mysql-server
To make your database more secure, run the following:
$ sudo mysql_secure_installation

VALIDATE PASSWORD COMPONENT can be used to test passwords
and improve security. It checks the strength of password
and allows the users to set only those passwords which are
secure enough. Would you like to setup VALIDATE PASSWORD component?

Press y|Y for Yes, any other key for No: y

There are three levels of password validation policy:

LOW    Length >= 8
MEDIUM Length >= 8, numeric, mixed case, and special characters
STRONG Length >= 8, numeric, mixed case, special characters and dictionary                  file

Please enter 0 = LOW, 1 = MEDIUM and 2 = STRONG: 2

dictionary stands for whether the password can contain dictionary words.

Please set the password for root here.
New password:
Re-enter new password:

Estimated strength of the password: 100
Do you wish to continue with the password provided?(Press y|Y for Yes, any other key for No) : y

Remove anonymous user: Y
Disallow root login remotely: Y
Remove test database and access to it: Y
Reload privilege tables now: Y

All done!
We can check our SQL database status by doing:
$ sudo service mysql status
Type ‘q’ to quit out of the status screen.
We can log into our SQL database by doing:
$ sudo mysql

Welcome to the MySQL monitor.  Commands end with ; or \g.
Your MySQL connection id is 10
Server version: 8.0.27-0ubuntu0.20.04.1 (Ubuntu)

Copyright (c) 2000, 2021, Oracle and/or its affiliates.

Oracle is a registered trademark of Oracle Corporation and/or its
affiliates. Other names may be trademarks of their respective
owners.

Type 'help;' or '\h' for help. Type '\c' to clear the current input statement.
To exit the MySQL console, type:
mysql> quit
6. Installing PHP on AWS EC2
Here, I want to make sure to install the latest version of php. Therefore, I first go here to check the latest stable release. Next, I follow the instructions here to enable the latest PHP release. First, I do:
$ sudo apt install software-properties-common
$ sudo add-apt-repository ppa:ondrej/php
This will give you access to all the versions of PHP. We can also manually download PHP files here.
The latest release is 8.1 BUT before installing the absolute latest version, check to make sure that the current version of WordPress supports that version of PHP.
To install PHP I do:
$ sudo apt-get update
$ sudo apt install php8.1
After installation, I can check my version of PHP
$ sudo php -v

PHP 8.1.1 (cli) (built: Dec 31 2021 07:26:20) (NTS)
Copyright (c) The PHP Group
Zend Engine v4.1.1, Copyright (c) Zend Technologies
    with Zend OPcache v8.1.1, Copyright (c), by Zend Technologies
For PHP to work with WordPress we will also need to install the following:
apt install libapache2-mod-php8.1
apt install php-mysql
Now we have our full LAMP stack. All that is left to do is to install WordPress.
7. Installing WordPress on AWS EC2
First, I go to where I set-up my virtual domain directory.
cd /var/www/your_domain
Next, I go to my DNS and create or edit the appropriate record so that it points to my new AWS EC2 instance. You can test your virtual server by entering the address in your web browser.
As a quick reminder, your virtual domain configuration file should be located here:
/etc/apache2/sites-available/your_domain.conf
Make sure you have run
$ sudo a2ensite your_domain.conf
$ sudo apachectl configtest
$ sudo systemctl reload apache2
NOTE: When you stop and start your AWS EC2 instance, the IP address will change. If you reboot the instance, it will keep the same IP addresses. If your IP address has changed, you will need to update your DNS records. If you want to keep the same IP address, you can get an Elastic IP, which may incur some charges depending on whether your instance is running or stopped.
To install WordPress, type:
wget http://wordpress.org/latest.tar.gz
To uncompress tar.gz file type:
tar -xzvf latest.tar.gz
Now we want to move all the files from the wordpress directory to our main you_domain directory.
cd wordpress
mv *.* ..
mv * ..
Check that all the files have been moved then delete the now empty wordpress directory.
ls
cd ..
rmdir wordpress
rm latest.tar.gz
We can also manually download WordPress install files from here. Now we need to create our WordPress database.
$ sudo mysql
This page gives a quick set of basic SQL commands.
mysql> CREATE DATABASE your_wp_database_name;
mysql> show databases;
Next, I want to create a WordPress user account for my database. For this, I go to this site to generate a random password. I exclude ambiguous characters and set the length to 20. Note that some older tutorials may skip this step and suggest accessing the WordPress database using the root account. For security reasons, this is a VERY BAD IDEA. In addition, newer versions of WordPress now requires a user OTHER THAN root.
mysql> CREATE USER 'newuser'@'localhost' IDENTIFIED BY 'password';
newuser is whatever user name to want to use to access your WordPress database and password is the password you generated above. Now check that the newuser you just created exists.
mysql> use mysql;
mysql> show tables;
mysql> SELECT user FROM user;
Now we want to give proper permissions to our newuser for our WordPress database.
mysql> GRANT ALL PRIVILEGES ON `your_wp_database_name` . * TO 'newuser'@'localhost';
mysql> FLUSH PRIVILEGES;
If you want to change your user password, run the following command:
mysql> ALTER USER 'newuser'@'localhost' IDENTIFIED BY 'NEW_USER_PASSWORD';
mysql> FLUSH PRIVILEGES;
Once we have our new user, we can create our WordPress wp-config.php file. Make sure we are at the main WordPress directory, which should be /var/www/you_domain
$ sudo mv wp-config-sample.php wp-config.php
$ sudo vi wp-config.php
- Put in our new WordPress database information.
- Go to https://api.wordpress.org/secret-key/1.1/salt/ and copy the lines.
- Replace the appropriate lines in wp-config.php
- Save and exit.
We are now ready to activate our WordPress site. Open a browser window and go to the virtual host site that you set up previously.
http://your_domain

We should get the above Welcome Screen. Enter in all the settings then hit Install WordPress. This should create your WordPress site and present you with the happy Success, WordPress has been installed page.

Great article. All worked great except for this step:
apt install php-mysql
Changing to this fixed it:
apt install php8.1-mysql
Thanks!