This plugin has been retired. It will no longer be supported or updated.
The Custom Background Plugin allows you to customize any WordPress theme by adding in your own background images and colors right from your WordPress Dashboard. You can create any number of backgrounds, and assign them to individual posts, post categories, or to your entire blog.
[Most recent Shiba Backgrounds updates]
Sept 9th, 2012 – Release 1.5
- Updated plugin for WordPress 3.4.
- Fixed Cheatin’uh error.
- Enable theme switching.
- Cleaned up how background data is stored.
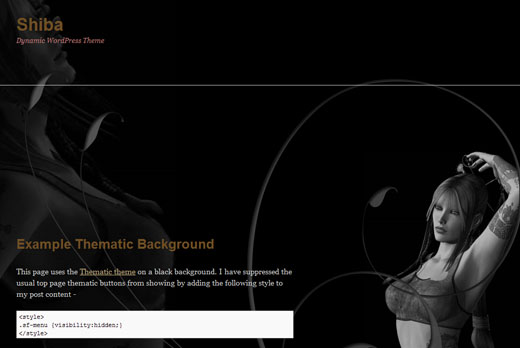


Here are some example pages with customized backgrounds. Themes used include Twenty Ten, Thematic, and Smooth. All pages were created using the Shiba Custom Background Plugin.
How to Get Shiba Backgrounds Plugin
1. Create a Custom Background
You can flexibly customize your theme by creating background objects. Background objects are similar to your WordPress galleries. They allow you to group together a set of images that you can then use as backgrounds for your theme.
Create a background object by going to Backgrounds >> Add New (Or Media >> Create Background in WordPress 2.9). Enter in a title for your background object and then click on Publish (Update Background in 2.9).
Congratulations – you have successfully created your first background object.

2. Assign Theme Colors
Background objects can also contain theme colors, in particular – background, text, link text, header, and sub-header colors.
The Edit Background screen gives you a color selector and a row of buttons for selecting the five different classes of colors. Click on the text class you want to select the color for, then select the color using the color-wheel.
As you select different colors, the text and background colors of the example paragraph text (to the left) will change. This gives you a rough idea of how your blog colors will look when combined together. Once you are happy with your color choices, click on the Update Background button. Your color choices will be saved, and be reflected in your assigned blog backgrounds.
The Propagate Colors checkbox will propagate the background and body text colors to all child containers within your theme.
If this box is left unchecked, the colors you just assigned will only be set for the body of your web page. As a result, they may get overridden by more specific color settings assigned by your current theme.
For example, the screenshot below shows the comments area for the example Thematic background with propagate colors turned off. As you can see, the comments area is now colored using the original Thematic theme colors.

The Use Theme Colors button will discard all colors associated with your background object and revert back to using your current theme colors.
In general, you either want to propagate colors, or just use your default theme colors. You may also set colors for only the components that you want. For example, you may just choose to set the background color and leave the other colors blank. In this case, the plugin will use your defined background color, and revert to original theme colors for all the other components.
Note – The plugin only sets colors for common HTML and WordPress blog tags. Some themes may use non-standardized tags, which will be left untouched by the plugin.
3. Load Background Images
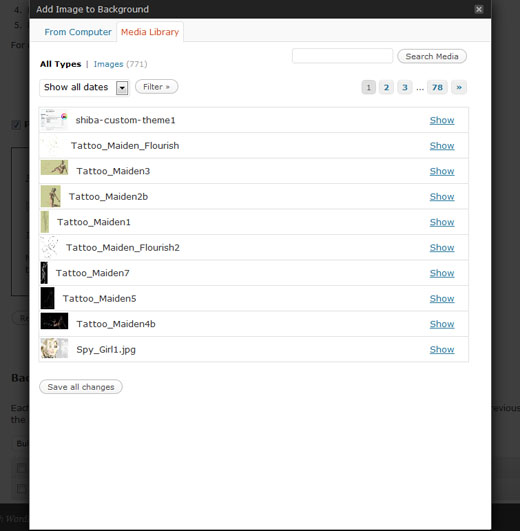
You can load images into your background object by clicking on the Add New button towards the bottom of the background edit screen.

Clicking on the Add New button will bring up a pop-up that allows you to include images either from your local computer, or from your blog Media Library.
The interface here is the same as the one used for inserting images into your blog posts. If you are loading images from your local computer, new attachment objects will be created for each image and added to your WordPress Media Library. Once you are done with the image uploads, click on the Save All Changes button and you will be returned to your Edit Background screen.
To include an image from your Media Library, click on the Media Library tab. Once you have selected an image that you want, click on the Insert into Post button. This will insert the image into your background object.


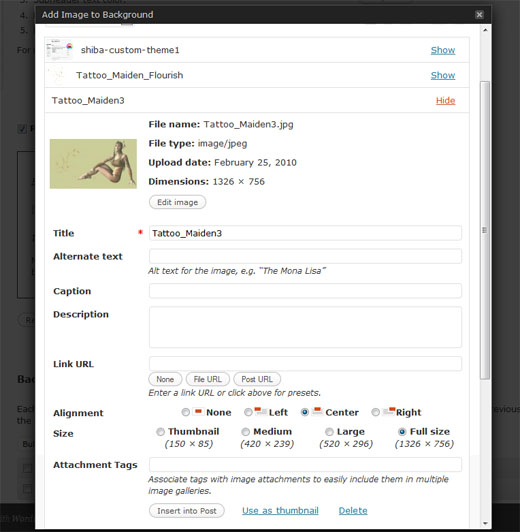
Note – An image can only be inserted into ONE background object. If you insert an already attached image to a new background object, the previous attachment will be removed. This also applies to post attachments. I.e., if you attach an image to a background object, its previous post attachment (if any) will also be replaced.
This is because an image/attachment can only be attached to ONE parent object at a time.

4. Position Background Images
Background images are positioned relative to a div container of your choice. Pick the container that encapsulates the main content of your blog. This is generally the content div in most WordPress themes.

Setting your background container to content will anchor all your background images to it, so that when you resize your browser window, all background images will move in relation to your blog content.
Try to use JPG images as much as possible to save on load time. A transparent PNG may add a nice touch from time to time, but they are much larger in size and will increase page load time.
The Allow Overflow option enables your background images to expand beyond their parent container. Checking this option will give your background a more continuous look.
5. All Done!
Now you are all done with your background object – time to show-off your awesome new WordPress theme design!
You may assign your new background object to posts, pages, tags, or categories. There should be a new drop-down menu in Edit Post, Edit Page, Edit Tag, and Edit Category that allows you to do this. Simply select the background object of your choice and update your post, page, tag, or category object.
You may also assign a background object to your entire blog.
define('SHIBA_BACKGROUND_DEFAULT', <background object id>);
Just insert the definition above into your main WordPress theme functions.php file.
With the Shiba Custom Background Plugin, you can easily create compelling, personalized, and unique backgrounds for your WordPress blog. Have fun creating new backgrounds and share some of your results with us!
Shiba Custom Background Updates
Shiba Backgrounds Release 1.4
April 22nd, 2011
- Updated plugin for WordPress 3.1. Plugin also works in WordPress multisite mode.
Shiba Backgrounds 1.2
July 13th, 2010
- Updated plugin for WordPress 3.0. Plugin also works in WordPress multisite mode.
- Background objects now use custom post types and taxonomy meta-data tables. This creates a cleaner and more secure interface.
- Cleaned up PHP notices.
Shiba Backgrounds 1.1
April 5th, 2010
- Added ability to remove default theme background images.
- Added ability to specify an ignore div list.
- All plugin functions are now encapsulated within a wrapper class.
- Plugin is more modular and more secure.
The plugin will not allow me to “add new” background images. When I click on the “add new” button it does not bring up the upload window layer. Is there a setting I need to change in WP to make this work, please? Thank you.
Hmmm, there probably is an issue or conflict with the thickbox javascript.
It is probably cleaner not to have the pop-up anyway, so I have removed it from the plugin. It now uses the standard download new image screen instead. Try reinstalling the plugin and see how it goes.
Ok – now the upload of new images works – cool.
BUT… I’m confused… when you upload a new image it automatically creates an “auto draft” and attaches the image to that draft…
AND… when you go to “Backgrounds” in the plugin it says “no backgrounds found”…
When you go to media library and click on the auto draft it created, that opens the page to cusomize pallette/background options/backgroun images…
When you go to a page and click on the background dropdown the only option is “none”…
LOL… it’s late, I’m tired. I’ll go at this again tomorrow. Apparently I need to re-read your instructions and practice with this a bit.
Thank you very much for fixing the upload issue! Good job!
Signing off for tonight,
Rhon-duhhh
Try doing the following –
1. Click on Backgrounds on your dashboard.
2. Click on Add New.
3. Type in a name for your background and hit Publish.
4. After you publish or save your background click on the Add New image button in the Edit Background screen.
5. Add in all background images.
6. After you are done adding images, click on Backgrounds. It should now list the new background you just created.
7. Click on the Background to edit it – and it should now show all the images you added.
Darn,
hoipe it works now without brackets
body class=custom style=position: relative , min-height:0pt; overflow: visible;
this is where my little css does its magic
thanks again
Joe
Hi there,
I run into a little problem, I am using wordpress 3.01 and the framework thesis, Your plugin installs without any problem and works almost out of the box.
Before using your plugin I would change the background using this little css trick :
body.custom { background: #8db6b6 url(‘background/bg-top-1.jpg’) 50% 0 no-repeat; background-attachment: fixed;}
That works immediately because the css changes the
I would really love to “attach” your code also to the body.custom, my css code fixes the background into position and with the 50% and 0 the background always stays centered no matter what the screen resolution is,
can you pls help me with that ?
best regards
Joe
I am not sure what your end goal is. Do you want to just add one background in fixed position? If so, I would use your old method for adding backgrounds, and use the plugin just for changing colors.
If you want to add the backgrounds to the body of your html page, then open up shiba-custom-background.php and look for
Replace it with
However, the plugin uses a series of absolute positioned divs to enable multiple background images, so fixed-attachments would probably cause strange results.
Hi,
thanks for your answer, i love your plugin, I want to use tons of different background images which I have already prepared, so basically I am ready to go 😉
The background images all have the same size,
How and where do I incorporate the other css
background: 50% 0 no-repeat;
background-attachment: fixed;
thanks for your patience
best regards from La Palma
Hey Joe,
The background divs all have the shiba-bg class attached to them so you can just add the CSS to the class. However,
will not work as intended because the plugin utilizes a series of absolute positioned divs rather than a single background image attached to a div.
I am mystified by this.
Nothing in the instructions you show exists, none of the screen shots you have are things that I can find. There is no update background button.
So exactly how is this supposed to work???
Chris
Is there a Backgrounds tab on the dashboard? If not, then the background custom post type is not getting created, probably because of some server environment conflict.
define(‘SHIBA_BACKGROUND_DEFAULT’, );
Are you sure this is right? I just copied it into the functions file and it broke the site, all it gave me is a php error unexpected <
Hmmm you will have to replace <background object id> with the background id that you want to use as the default. For example,
The list of object IDs should be shown on the main Backgrounds screen.
On my to-do list is to let people set this option from a Dashboard menu rather than having to add PHP code.
website is not published yet. created a BG, selected it in Category, does not retain the value – defaults back to NONE. Please help. Using WP 3.0, with a mod of Tribal.
Hi Steve,
I am currently working on updating the plugin for 3.0. It was last on my list so I am a bit late on this one. I will post something once I am done with the update.
I have just finished updating the plugin for 3.0. Please let me know if you encounter any bugs or issues.
Apologies for the delay.
Thanks for the update. However, the Category selection bug still remains as described above. Granted, this is not a clean install, so I will try it on another development project. But at this point, selecting a BG for a Category reverts back to None, no matter what. – Steve
I am having problems duplicating the bug.
Can you attach backgrounds to posts and pages?
Can you attach backgrounds to blog-wide conditions – under Backgrounds >> Options?
Can you attach backgrounds to tags?
The only thing that comes to mind is that there was some issue while creating the term meta-table. The plugin creates a new table called wp_shiba_termmeta to store metadata associated with categories and tags.
If you are comfortable with it, can you check on your server to see if this table exists? Thanks.
I´ve got the same problem. Whenever I choose a BG for a category it returns to “None” after saving. It works great on posts or pages! I took a look into the db – the wp_shiba_termmeta – table exists, however, its still empty. So maybe the bug is located somewhere around the insert data to database function?
So, do you think you find the time to fix that bug or give me some support to fix it on my own? (I have to use WP 2.9)
Thanks a lot!
Shawn & Fabrice,
I have fixed the color bugs that you describe in the new version of the plugin. Also added some new features –
http://www.shibashake.com/wordpress-theme/wordpress-custom-backgrounds-1-1
I was not able to test it out on the Contrast theme since it is a purchased theme. The theme does contain a lot of specialized design elements though – so some of the plugin colors, in particular text colors may not get applied by the theme.
Also apologies to Shawn for not looking into the bugs sooner.
Please let me know if you run into more bugs or issues. Thanks.
Hello Fabrice,
I am looking into it now. Can you let me know what theme you are using?
Thx.
Hello, thanks for your answer.
Yes shure the theme used is http://themeforest.net/item/contrast/68089
I wanted to use your plugin to be able to set the different colors for the content background, text font, etc..
So I tried into the admin defining some colours, but after I hit the button “update background” , my background name is saved but it seems that the settings are not saved. (When I come back to it, I can’t see the preview with the right colours).
Hi Shawn,
That would be my guess. I am not familiar with the innards of WPMU and how it differs from regular WP so I am not exactly sure where the issue is. Perhaps sometime in the future I will look into WPMU.
You would need to edit the plugin for that. Look for the line –
var content = jQuery('#<?php echo $bg_attr[0];?>');in the file shiba-custom-background.php and replace it with –
var content = jQuery('body');The issue with anchoring the background images to the body is that they will move around when the browser gets re-sized which is frequently not the desired result, especially for fixed width themes.
Interesting concept.
I did try installing on my wpmu 2.9.2 system today, and it seemed to install correctly. I can get to the plugin settings.
However, when I choose colors and then save background, the colors are not saved, and the default values return.
I was able to create a new background image itself and it does appear in the listing.
However, when I assign it to a category, the image does not show up, nor do the colors change.
probably a bug with using wpmu?
finally:
how would I go about assigning a background to the body tag for a given category?
Hi,
I got the same issue.. colors are not saved and the default values return.
I am not using wpmu but standard WordPress updated with last version.
Could you please help ?
Thanks.