One of the key features of WordPress 3.0 is the integration of WordPress original and WordPress multi-site (MU). Here are instructions on how to turn on the multi-site option within WordPress 3.0.
Currently, turning on the WordPress multi-site option is a non-trivial process. There is a plugin that allows for one-click multisite, but this is not recommended by WordPress due to the complexity of the multi-site installation.
Once I turned on the multi-site WordPress option, I faced another challenge. I already had several blogs running on my site, and I wanted to move these existing blogs under the umbrella of my new multi-site setup.
Here we consider how to move an existing blog into WordPress multi-site. We assume that you already have a multi-site blog.
Note – ONLY attempt this process if you are very comfortable with manipulating files and databases on your server. The steps outlined here worked on my blogs and on my server configuration. This does not mean it will work in the same way in other server setups.
Read through the entire article first before making any changes to your blog. Please DO NOT try this if you are new to WordPress or if you do not understand any of the steps in the article.
If you are not careful, you may corrupt your WordPress database and lose data.
1. Back-Up Everything
The most important step in this process is to backup your target and destination blogs. I created three different backups of my blogs –

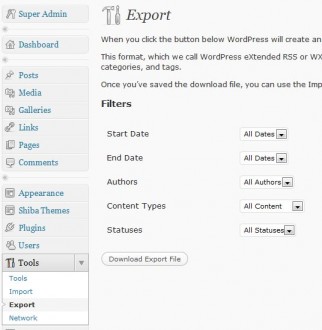
- Export WordPress Data – Go into Tools >> Export and save all of your blog data as an XML file on your local computer.
- Backup WordPress Database – Backup your WordPress database by following the instructions here.
- Copy WordPress Directory – Create a copy of your WordPress directory on the server and compress it. Transfer your compressed file onto your local computer.
2. Create New Site
Now we are ready to transfer an existing site into our WordPress multi-site. As an example, we will use our Blog Art site.
Originally the Blog Art site had its own WordPress installation in the directory /blog-art on the server. The root directory of the server contains a multi-site installation of WordPress. Here, we want to create a copy of Blog Art in our multi-site installation, and have it replace our old single-site Blog Art installation.
- Make sure that all of the plugins you want to use for your original site still runs on your multi-site installation. Many plugins DO NOT support the multi-site option so make sure you have replacement plugins for those that don’t.
- Upgrade your original blog to the same WordPress version as your multi-site installation. Make sure that everything is running smoothly after the upgrade.
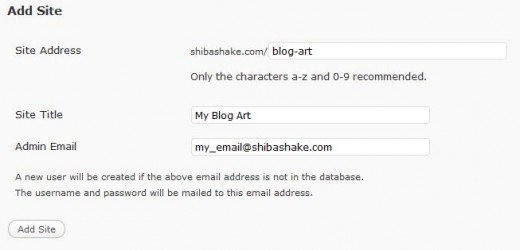
- Click on Super Admin, then Create a New Site. Create a new site on your multi-site installation with the directory or sub-domain structure that you want. In this example, we set the directory to blog-art.

Note – If your new site has the same address as your old site, the shared address will still point to your old site, so everything will still be up and running. Your new site will not be accessible until you change the directory name of your old site – which we will do much later.
3. Copy Files from Old Site to New Site
First, copy all media directories and files from your old blog (those stored in your wp-content/uploads directory) to your newly created site. Your new site will store its media content in –
/multisite_root/wp-content/blogs.dir/[blog_id]/files.
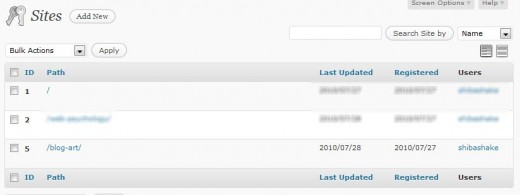
You can easily get your new blog_id by going into Super Admin >> Sites and looking at the ID column of all your listed sites.

For example, we copy all directories and files in /blog-art/wp-content/uploads/ to /wp-content/blogs.dir/5/files/
4. Copy SQL Data from Old Site to New Site
Now, we want to copy all of our old blog data (e.g. posts, pages, tags, categories) over to our new site. I tested out two methods –
1. Import File Method
I imported the export file I created earlier using Tools >> Export. This method gets me all of my posts, pages, and custom post types. It also gets me all of my tags, categories, custom taxonomy terms, and comments.
However, this method has the following weaknesses –
- Thumbnail and featured images are not transferred.
- iframes in posts and pages are lost.
- Post and term metadata are lost.
- Links to media files in posts and pages point to old links (i.e. they point to wp-content/uploads and not blogs.dir/5/files.
2. Copy Database Table Method
This was the method that I used because it was more efficient for me.
Instead of using the export/import functionality, you can also go into your server and copy all the relevant data from your old blog database tables into your new blog tables.
Here is how to do it in phpMyAdmin –
- Log into phpMyAdmin.
- Click on the database you want to copy (left side of screen). This is the database used for your old blog.
- Click on the table you want to copy (left side of screen).
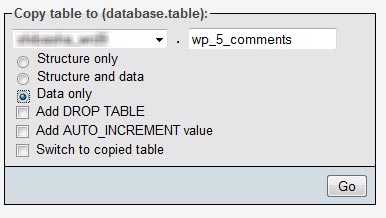
- Click on the Operations tab at the top. On the right side of the screen, below the Move table to interface, there will be a Copy table to interface (example shown below). Before you copy the data over, you may first want to clear the destination table on your new blog.
- Open a new phpMyAdmin screen.
- Click on the database for your new blog (left side of screen).
- Click on the table you want to copy data into. The table names will be of the form wp_[blog_id]_comments, or wp_[blog_id]_posts. In this example, our blog_id is 5, so our destination tables look like wp_5_comments or wp_5_posts.
- Make sure the table selected is from your newly created blog. Make sure it only contains default data. Only copy the data tables and do not mess with the wp_options table.
For example, I copied the following tables –
- wp_commentmeta
- wp_comments
- wp_links
- wp_postmeta
- wp_posts
- wp_terms
- wp_term_relationships
- wp_term_taxonomy
- Click on the Empty tab at the top. This will delete all data from the table.
- Use the Copy table to interface to copy table data from your old blog to your new blog. I had to repeat the above operations for each table.
Remember to empty the destination table (on your new blog) before copying data into it (from your old blog).
- widget_pages
- widget_calendar
- widget_archives
- widget_links
- widget_meta
- widget_search
- widget_categories
- widget_text
- widget_rss
- widget_recent-posts
- widget_recent-comments
- widget_tag_cloud

If you do not want to use phpMyAdmin, the SQL commands used are as follows:
The SQL command used for clearing a table –
TRUNCATE TABLE new_table
The SQL command used to copy a table from our old blog to our new blog –
INSERT INTO new_database.new_table
SELECT *
FROM old_database.old_table;
5. Activate Our New Site
After we finish copying all our data, we are ready to activate our new site.
If your new site has the SAME address as your old site, you till need to change the directory name of your old site.
Log into your server and change the name of your old blog to [old-blog-name]-tmp. For example, I changed my old blog directory name from blog-art to blog-art-tmp. Now you will not have any directory called blog-art.
If you access /blog-art at this point you will be directed to your new multi-site blog and it should come up with the Twenty Ten default theme.

Log into the admin panel of your new site and redefine your blog settings, permalink settings, plugin settings, etc. Make sure that all the data has been copied and the plugins are all running.
If anything is wrong, you can easily restore your old blog by changing its main directory name back to what it was (e.g. changing /blog-art-tmp back to /blog-art).

6. Where Are My Widgets?!
One thing you will quickly notice is that you have lost all of your previous widget settings.
Widget settings are saved in the wp_options table so you can restore some of that information by going to the old/original blog database, clicking on the wp_options table and doing a search for option_name %LIKE% widget.

This will retrieve elements that look like the following –
These options will also exist in your new blog database options table (wp_[blog_id]_options). You want to copy the option_values from your old blog widgets to your new blog widgets. Make sure to only copy option values that correspond to known widget classes, for example the option_names listed above.
Copying these option values restored most of my widget settings. Native text widget settings, however, were NOT RESTORED. I had to manually recreate those.
7. Image Links
You will also notice that the image links in your posts and pages still point to your old media structure (i.e. wp-content/uploads). As a result, your images will not load properly.
A quick fix is to add a 301 redirect so that the old wp-content/uploads location gets redirected to your new wp-content/blogs.dir/[blog_id]/files location.
redirect 301 /blog-art/wp-content/uploads/ http://shibashake.com/blog-art/files/
However, the better solution would be to write some scripts to bulk replace all your old image links with your new image links.
Phew – We Are Done
Remember that you can revert back to your old blog at any time simply by changing its main directory name back to the original name.
Hi,
I am not friendly with sql, is their any plugin available.
Waiting for reply.
Thanks
Thanks a lot, Shiba! With some improvements, got this to work on WordPress 4.1.1, log of it here: http://astgtciv.tumblr.com/post/113603025236/migrating-an-existing-standalone-wordpress-into .
I am not sure how will this work. WordPress multisite uses virtualization to create different sites. How can you import content into a folder ? The only way I can see this working is by importing wxr files
http://codex.wordpress.org/Migrating_Multiple_Blogs_into_WordPress_3.0_Multisite
i actually just tried this..after lots of headaches, it worked flawlessly. Thanks Shiba!
Hi,
thanks for the great post!
One thing I noticed with WP 3.8 is that instead of a wp-content/blogs.dir//files directory, you need to use wp-content/uploads/sites/
Otherwise…all work great!
Thanks for your tutorial.
Since the 3.8 update, is there any change ? There is no more blogs.dir directory to be created.
I followed your tutorial but figured out that in my network (where I have 3 blogs), two of them are not really linked to the multisite mode. Indeed, I can’t manage the updates and the plugins through the super-admin mode.
Thanks