The WordPress Quick Edit menu allows us to quickly modify certain object attributes without having to go into the full object Edit Screen. The Quick Edit menu uses javascript to display the edit interface, thereby saving us time and additional calls to our WordPress server.

The first step towards expanding our WordPress Quick Edit Menu is to add a custom column to our target Edit Screen. In this example tutorial, we will expand the Quick Edit menu for Post objects. Therefore, we start by adding a custom column to our Posts screen.
1. Add a Custom Column
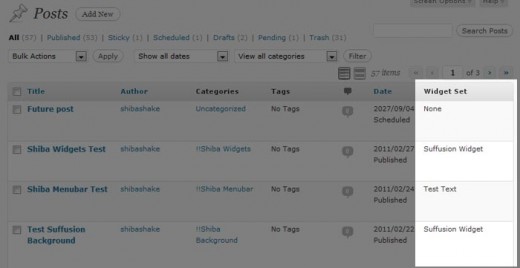
We add a custom column called Widget Set which shows some custom meta data associated with our Post objects.
// Add to our admin_init function
add_filter('manage_post_posts_columns', 'shiba_add_post_columns');

function shiba_add_post_columns($columns) {
	$columns['widget_set'] = 'Widget Set';
	return $columns;
}
The code above adds a new but empty column to our Posts screen.

To fill our new column with the relevant meta-data values, we use the manage_posts_custom_column action hook.
// Add to our admin_init function
add_action('manage_posts_custom_column', 'shiba_render_post_columns', 10, 2);

function shiba_render_post_columns($column_name, $id) {
	switch ($column_name) {
	case 'widget_set':
		// show widget set
		$widget_id = get_post_meta( $id, 'post_widget', TRUE);
		$widget_set = NULL;
		if ($widget_id)
			$widget_set = get_post($widget_id);
		if (is_object($widget_set)) echo $widget_set->post_title;
		else echo 'None';
		break;
	}
}
Line 2 – Add the manage_posts_custom_column action hook to our admin_init function.
Lines 5 to 6 – Check for our new custom column.
Lines 8 to 13 – Render our custom Post object meta-data values.

Now, our new column is filled with the relevant meta-data values.
2. Expand the WordPress Quick Edit Menu
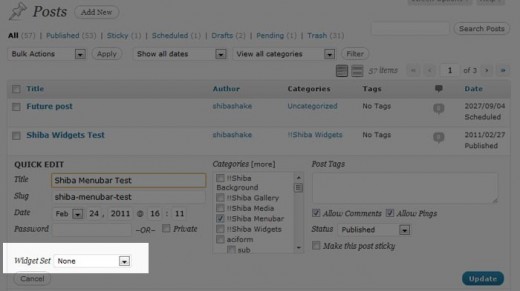
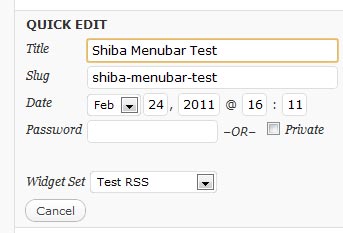
After adding our custom column, we are ready to expand our Post Quick Edit menu using the quick_edit_custom_box action hook.
Note – The quick_edit_custom_box action hook will not fire unless there are custom columns present. That is why we started by adding a custom column.
// Add to our admin_init function
add_action('quick_edit_custom_box',  'shiba_add_quick_edit', 10, 2);

function shiba_add_quick_edit($column_name, $post_type) {
	if ($column_name != 'widget_set') return;
	?>
    <fieldset class="inline-edit-col-left">
	<div class="inline-edit-col">
		<span class="title">Widget Set</span>
		<input type="hidden" name="shiba_widget_set_noncename" id="shiba_widget_set_noncename" value="" />
		<?php // Get all widget sets
			$widget_sets = get_posts( array( 'post_type' => 'widget_set',
							'numberposts' => -1,
							'post_status' => 'publish') );
		?>
		<select name='post_widget_set' id='post_widget_set'>
			<option class='widget-option' value='0'>None</option>
			<?php
			foreach ($widget_sets as $widget_set) {
				echo "<option class='widget-option' value='{$widget_set->ID}'>{$widget_set->post_title}</option>\n";
			}
		        ?>
		</select>
	</div>
    </fieldset>
	<?php
}
Line 5 – Only render our Quick Edit extension on the relevant screen.
Lines 7 to 25 – Render our custom drop-down menu for selecting widget sets.

3. Save Custom Quick Edit Data
We save our new quick edit menu data in the same way that we save new custom meta-box data – through the save_post action hook. The save_post function below was adapted from the example found on WordPress.org.
// Add to our admin_init function
add_action('save_post', 'shiba_save_quick_edit_data');

function shiba_save_quick_edit_data($post_id) {
	// verify if this is an auto save routine. If it is our form has not been submitted, so we dont want
	// to do anything
	if ( defined('DOING_AUTOSAVE') && DOING_AUTOSAVE )
		return $post_id;
	// Check permissions
	if ( 'page' == $_POST['post_type'] ) {
		if ( !current_user_can( 'edit_page', $post_id ) )
			return $post_id;
	} else {
		if ( !current_user_can( 'edit_post', $post_id ) )
		return $post_id;
	}
	// OK, we're authenticated: we need to find and save the data
	$post = get_post($post_id);
	if (isset($_POST['post_widget_set']) && ($post->post_type != 'revision')) {
		$widget_set_id = esc_attr($_POST['post_widget_set']);
		if ($widget_set_id)
			update_post_meta( $post_id, 'post_widget', $widget_set_id);
		else
			delete_post_meta( $post_id, 'post_widget');
	}
	return $widget_set_id;
}
4. Update the Quick Edit Menu with Javascript
Now comes the really fun part – notice that while our new custom input shows up in the Quick Edit menu, it is not properly updated to show which ‘widget_set‘ the current Post object is set to. I.e., our widget set meta-data is not getting through to our custom Quick Edit menu.
The set_inline_widget_set javascript function below updates our Quick Edit menu with the relevant meta-data.
// Add to our admin_init function
add_action('admin_footer', 'shiba_quick_edit_javascript');

function shiba_quick_edit_javascript() {
	global $current_screen;
	if (($current_screen->id != 'edit-post') || ($current_screen->post_type != 'post')) return;

	?>
	<script type="text/javascript">
	<!--
	function set_inline_widget_set(widgetSet, nonce) {
		// revert Quick Edit menu so that it refreshes properly
		inlineEditPost.revert();
		var widgetInput = document.getElementById('post_widget_set');
		var nonceInput = document.getElementById('shiba_widget_set_noncename');
		nonceInput.value = nonce;
		// check option manually
		for (i = 0; i < widgetInput.options.length; i++) {
			if (widgetInput.options[i].value == widgetSet) {
				widgetInput.options[i].setAttribute("selected", "selected");
			} else { widgetInput.options[i].removeAttribute("selected"); }
		}
	}
	//-->
	</script>
	<?php
}
Lines 5 to 6 – Only add the javascript quick edit function to the Posts screen.
Line 13 – Make sure that Quick Edit menu is closed. The revert function (defined in inline-edit-post.js) ensures that our Quick Edit custom inputs are properly updated when we switch Post objects.
Lines 15 to 16 – Set nonce value for our custom inputs. If we want, we can expand our save_post function to do a nonce check.
Lines 18 to 22 – Set the proper widget set option on our custom Quick Edit drop-down menu.
5. Link Javascript to the Quick Edit Link
Finally, we want to link our set_inline_widget_set javascript function to the Quick Edit link so that it will update all our custom input values when a Quick Edit link is clicked.
We do this by hooking into the post_row_actions filter. Post object link actions are originally defined in the WP_Posts_List_Table class.
// Add to our admin_init function
add_filter('post_row_actions', 'shiba_expand_quick_edit_link', 10, 2);
function shiba_expand_quick_edit_link($actions, $post) {
global $current_screen;
if (($current_screen->id != 'edit-post') || ($current_screen->post_type != 'post')) return $actions;
$nonce = wp_create_nonce( 'shiba_widget_set'.$post->ID);
$widget_id = get_post_meta( $post->ID, 'post_widget', TRUE);
$actions['inline hide-if-no-js'] = '<a href="#" class="editinline" title="';
$actions['inline hide-if-no-js'] .= esc_attr( __( 'Edit this item inline' ) ) . '" ';
$actions['inline hide-if-no-js'] .= " onclick=\"set_inline_widget_set('{$widget_id}', '{$nonce}')\">";
$actions['inline hide-if-no-js'] .= __( 'Quick Edit' );
$actions['inline hide-if-no-js'] .= '</a>';
return $actions;
}

Lines 5 to 6 – Only expand Quick Edit links for the Posts screen.
Lines 8 to 9 – Get nonce and other custom input values associated with the current post.
Line 12 – Add the onclick event to our Quick Edit link and associate it to our set_inline_widget_set javascript function.
Related Quick Edit Menu Source Files
- Javascript Quick Edit file for post objects.
- inline_edit – Renders the HTML Quick Edit menu form.
- get_inline_data – Generates data that is later used by the javascript inline editor for posts and pages.
- Quick Edit link action.
hi! i love this. i just noticed that when you update the post after quick editing the ‘widget set’.. that if you go back to the quick edit, the drop down doesn’t remember the value. this probably b/c there is no comparison of the the current value to the value in the foreach loop
 foreach ($widget_sets as $widget_set) {
 echo "ID}'>{$widget_set->post_title}\n";
 }
and setting selected=”selected”. though there might be more to the javascript side of things
thumbs up to Jan’s idea! i also have been wondering for a while if the thumbnail (added from your other tutorial) could be changed/set from the quick edit menu.
I get these errors in the Firebug console when I use this code. Clicking the quick edit link doesn’t work when I use my copied and pasted version of the code.
ReferenceError: Can’t find variable: inlineEditPost
ReferenceError: Can’t find variable: set_inline_widget_set
Where are you trying to add the quick edit expansion? What version of WP are you running?
inlineEditPost should be defined in inline-edit-post.js (a native WP file) which automatically gets loaded in the Edit Post screen.
Thank you so much for this tutorial! You are amazing.
I think there’s a typo, in the last bit of code:
It looks like you have an extra “)” here:
// Add to our admin_init function
add_filter(‘post_row_actions’, ‘shiba_expand_quick_edit_link’), 10, 2);
Do you know if this is possible for custom post types?
nvm
You are my hero – the only person I could find that may have a chance at helping me!
Is there any way you would take a paying job to help me create a column in my wp-admin post screen? I just installed the la petite URL plugin, and want the shortened URL’s to display on my main admin posts screen (for quick reference). I don’t need it in the quick edit function – just a column that displays the link/data.
Please contact me at the email I put into the comment. Thanks!
Hello Perry,
I don’t work on external projects but here is a tutorial on adding admin columns –
http://shibashake.com/wordpress-theme/add-admin-columns-in-wordpress
It should be much easier to add admin columns than to expand the quick edit menu.
This was an amazing article! I’m still fairly new to WordPress, so I’m learning as much about cutomizing it and using it as I can. This was some great info for me; it is helping me to better understand the programming side of WordPress, since I am trained more on the graphic side 🙂
I think I love you 🙂
Thanks so much for this.. I can’t tell you how much help this was for me.
With more appreciation than you could shake a stick at..
Michael.
LOL! Well love is great and all but diamonds are a girl’s best friend. 😉
I wonder if you could use it to add a “quick edit” button to the Media Library? It would be very useful to modify the captions and alts from there…
Thanks!
That is a good idea. I will add that to my to-do list.
Thanks – You’re article helped a lot understanding and using quickedit.
greets from Salzburg,
– johannes
Glad it was helpful. Nice photographs on your site. 🙂