There are several different ways to add new styles or CSS code into your WordPress blog. The easiest way may not be the most efficient way and vice versa. Here, we consider the easiest way first.
1. Add Styles Using a Text Widget
The easiest way to add new styles into a WordPress blog is through the standard Text Widget.
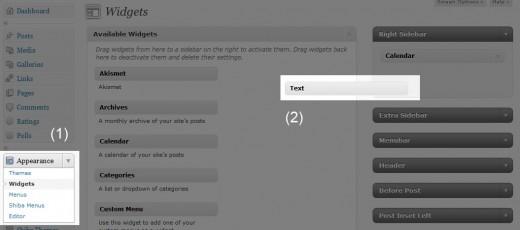
- Go to Appearance >> Widgets in your WordPress Dashboard.
- Open an existing Text Widget or drag a new Text Widget from the Available Widgets area into one of the sidebar areas to the right.
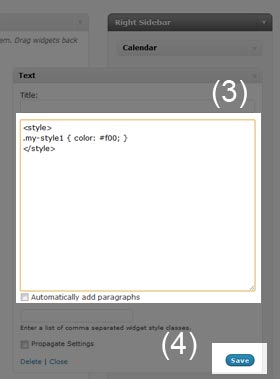
- Open up the Text Widget and enter in your style block. Style blocks start with the <style> tag and ends with the </style> tag. In this example, our style block looks like this –
<style> .my-style1 { color: #f00; } </style> - Click on the Save button at the bottom of the Text Widget.
- As an example, we apply this new style to this sequence of words.
This method for adding styles is simple and safe because it does not require any theme file editing.
However, this method is inefficient because it includes style blocks within the body of our blog page. For greatest efficiency all CSS should be in the document head.
2. Add Styles Within a Post
You may also add inline styles within your WordPress post.
- Edit your post.
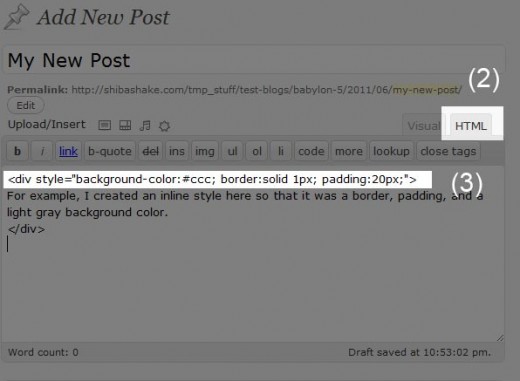
- Click on the HTML tab on the Edit Post screen. This allows you to view and edit HTML tags within your post.
- Enter in your inline style.For example, I created an inline style here so that it has a border, padding, and a light gray background color.
This is what the HTML looks like –
<div style="background-color:#ccc; border:solid 1px; padding:20px;">
For example, I created an inline style here so that it was a border, padding, and a light gray background color.
</div>
We may also add inline <style> blocks within the body of our WordPress post like we did in the Text Widget section above. However, this method has the same browser inefficiencies.
3. Add Styles into Current Theme
New styles can also be added by editing the style.css file of your current theme.
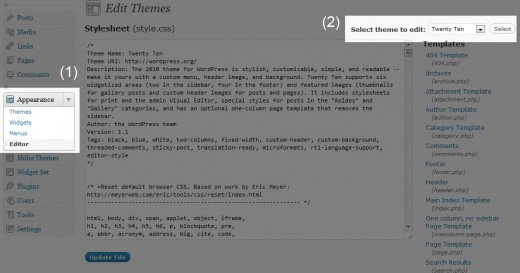
- Go into the Appearance >> Editor menu on your WordPress dashboard.
- Select the theme that you want to add styles to from the dropdown menu at the top right of the screen.
- Scroll down and click on the Stylesheet (style.css) entry on the bottom right of the screen. This will load the style.css file into the theme editor area.
- Add new styles into the style.css file using the Theme Editor.
- Click on the Update File button when you are done.
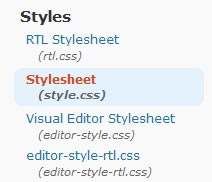
The main weakness of adding styles directly into your current theme is that all added styles will be lost when you do a theme update because the style.css file will be replaced.
To preserve your added styles, consider using a child theme.
4. Add Styles into a Child Theme
Adding styles into the style.css file of a child theme is probably the cleanest and most efficient method.
Child themes allow us to group all of our added styles together, and they allow us to easily transfer our own styles across theme updates.
However, it does require some knowledge of child themes.
Thank you so much… this has solved my problem with wrapping text around images that I couldn’t find a sensible solution to anywhere else. Thanks
Great guide to the various places into which you can insert new CSS styles! Linked to this off of my FB fan page.