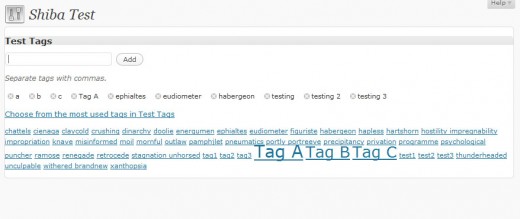
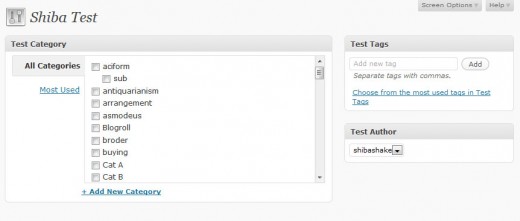
Meta-boxes are interface objects that allow you to easily associate additional information with your WordPress posts, pages, or links. If you go into your WordPress Edit Post screen, you will see a variety of standard WordPress meta-boxes, including those for entering tags, categories, post thumbnails, and setting post status.
You can create your own meta-box if you want, or you can add standard WordPress meta-boxes to your plugin and theme interface. In this article, we focus on how to add an existing WordPress meta-box.
1. Add Standard WordPress Meta-Box
We start out by adding a simple WordPress tag meta-box to our plugin interface. To do this, include the code below into your plugin menu page.
For an example of how to create a plugin menu page, refer to the Shiba Example Plugin.
if (is_file('includes/meta-boxes.php'))
	require_once('includes/meta-boxes.php');
else
	require_once(SHIBA_TEST_DIR.'/meta-boxes.php');

add_meta_box(	'tagsdiv-post_tag', __('Test Tags'), 'post_tags_meta_box',
		'settings_page_shiba_test', 'side', 'core');
Lines 1-4 loads the standard WordPress meta-box functions. As of WordPress 2.9, these meta-box functions are conveniently grouped in the includes/meta-boxes.php file in your WordPress installation. For previous versions of WordPress, you will have to include this file in your plugin environment.
Lines 6-7 registers the standard WordPress tag meta-box for our plugin page which is called ‘settings_page_shiba_test’ in this example.
This is the name that is returned by add_submenu_page or any of the other add_*_page functions.
Note – This name contains not just the page handle, e.g. shiba_test, but also the parent page handle, e.g. settings_page. That is why in the example above we use the name settings_page_shiba_test.
Below are the other standard WordPress meta-box functions available and how you must name them while using the add_meta_box command (i.e. argument 1 = meta-box name/div name, argument 3 = function name) –
- post_submit_meta_box – submitdiv
- post_tags_meta_box – tagsdiv-post_tag
- post_categories_meta_box – categorydiv
- post_excerpt_meta_box – postexcerpt
- post_trackback_meta_box – trackbacksdiv
- post_custom_meta_box – postcustom
- post_comment_status_meta_box – commentstatusdiv
- post_comment_meta_box – commentsdiv
- post_slug_meta_box – slugdiv
- post_author_meta_box
- post_revisions_meta_box – revisionsdiv
- page_attributes_meta_box – pageparentdiv
- link_submit_meta_box – linksubmitdiv
- link_categories_meta_box – linkcategorydiv
- link_target_meta_box – linktargetdiv
- link_xfn_meta_box – linkxfndiv
- link_advanced_meta_box – linkadvanceddiv
- post_thumbnail_meta_box – postimagediv
2. Render Standard WordPress Meta-Box
The code above just registers the meta-box, it does not render it. To render the meta-box onto your plugin page, you must use the do_meta_boxes function. Add do_meta_boxes to the HTML div where you want your meta-boxes to appear.
<?php $meta_boxes = do_meta_boxes('settings_page_shiba_test', 'side', $test_object); ?>
The first argument specifies the page where you are rendering the meta-boxes to, for example posts, pages, links, or your own plugin page. In the example above we are rendering to our own plugin test page called settings_page_shiba_test. This name should exactly match the page name used above in your add_meta_box function.
Adding do_meta_boxes will render the standard WordPress tag meta-box in your plugin page.

3. Enable Meta-Box Interface
You will quickly notice that even though the meta-box is rendered, the interface does not work. Adding tags do not work, and clicking on the buttons or links does nothing.
To enable the tag meta-box interface, you will need to include the Javascript associated with it, in this case post.js. If you are adding link meta-boxes instead of post meta-boxes then you want to include link.js. However, you can only include one of them at a time.
add_action("admin_print_scripts-settings_page_shiba_test", array(&$this,'add_shiba_example_admin_scripts'));

function add_shiba_example_admin_scripts() {
	wp_enqueue_script('post');
}
Line 1 uses the add_action function to associate shiba_example_admin_scripts to our plugin page and only to our plugin page.
Line 4 loads the post.js javascript which now makes the tag meta-box active.

4. Collapse the Meta-Box Interface
Now the meta-box interface is active but we still cannot close or collapse the meta-box, and we cannot drag and drop our meta-boxes.
This article and example plugin from Code Styling explains very well what you must do to achieve this.
In essence, you must run the add_meta_box function from the ‘load-$pagename’ action hook, which in our example is ‘load-settings_page_shiba_test’. If you use the add_meta_box function within the page itself, then you will not be able to close the meta-boxes or drag and drop them.
Therefore, instead of calling our add_meta_box function in the body of our plugin page file as was done above, we do it based on the load-settings_page_shiba_test action hook.
add_action("load-settings_page_shiba_test", array(&$this, 'on_load_shiba_test_page'));

function on_load_shiba_test_page() {
add_meta_box(	'tagsdiv-post_tag', __('Test Tags'),
				'post_tags_meta_box',
				settings_page_shiba_test, 'side', 'core');
	}
In addition, you will need to run the postboxes.add_postbox_toggles Javascript function for the collapsible meta-boxes to work.
<script type="text/javascript">
	//<![CDATA[
	jQuery(document).ready( function($) {
             postboxes.add_postbox_toggles('settings_page_shiba_test');
        });
	//]]>
</script>
5. Meta-Box Layout
Thus far our meta-box has no layout and is merely rendered to fill the entire width of our page. Using a simplified example from Code Styling we can set our plugin menu to have a two column layout similar to the post, page, and link menus.
    <?php global $screen_layout_columns;?>
    <?php wp_nonce_field('closedpostboxes', 'closedpostboxesnonce', false ); ?>
    <?php wp_nonce_field('meta-box-order', 'meta-box-order-nonce', false ); ?>
    <div id="poststuff" class="metabox-holder<?php echo 2 == $screen_layout_columns ? ' has-right-sidebar' : ''; ?>">
        <div id="side-info-column" class="inner-sidebar">
		<?php $meta_boxes = do_meta_boxes('settings_page_shiba_test', 'side', $test_object); ?>
        </div>
        <div id="post-body" class="has-sidebar">
            <div id="post-body-content" class="has-sidebar-content">
			<?php $meta_boxes = do_meta_boxes('settings_page_shiba_test', 'normal', $test_object); ?>
                <?php $meta_boxes = do_meta_boxes('settings_page_shiba_test', 'additional', $test_object); ?>
           </div>
        </div>
        <br class="clear"/>

    </div>	<!-- end poststuff -->
Note – The closedpostboxes and meta-box-order nonce fields are both needed for proper operation of the Screen Options settings and the drag and drop operations.
To enable number-of-columns selection under Screen Options, you will need to add in the screen_layout_columns filter. You can then set the number of columns for your plugin page in your filter function.
add_filter('screen_layout_columns', array(&$this, 'on_screen_shiba_test_columns'), 10, 2);

function on_screen_shiba_test_columns($columns, $screen) {
	if ($screen == 'settings_page_shiba_test') {
		$columns['settings_page_shiba_test'] = 2;
	}
	return $columns;
}

6. Getting Your Meta-Box Values
At some point, you will want to retrieve the values from your WordPress meta-box and save them or use them for further processing. To do this you must identify where those values are stored in the $_GET or $_POST arrays.
For example, to get the values from the standard tag meta-box, we can use the code below –
if (!isset($_GET['tax_input']['post_tag'])) return;
$tag_arr = explode(',',esc_attr($_GET['tax_input']['post_tag']));
The simplest way to find out where the meta-box results are stored is to add a print_r statement to the beginning of your plugin page. In this way, we discover that –
- [‘tax_input’][‘post_tag’] contains our tag values,
- [‘newtag’][‘post_tag’] contains any new tags added,
- [‘post_author_override’] contains the author meta-box id,
- [‘post_category’] contains an array of category ids,
- [‘newcat’] contains any new categories added,
- [‘newcat_parent] contains the parent of any new categories added.
Once you identify the location of your meta-box values, you can easily extract and process them in your form processing function.
7. Congratulations You Are Done!
Whew – and we are done!
Many thanks to Heiko Rabe (Code Styling Project) for his excellent tutorial on enabling drag and drop as well as screen option capabilities for meta-boxes.
I’ve managed to get the categorydiv added to the Page, and even save the values set there. But curiously, the categorydiv is set do display: none for some reason. I am using a blank wordpress theme, may have something to do with it?
Thanks in advance.
Yours has been the only post that really helped. With your explanation I could fix my problems, thanks a lot!!
Reason why I need this: I want my word-press post be in specific category like Country – State – City. But my list is toooooo big so it causes the loading time so higher.
I want to modify this category section like.
On the new post it only shows the country list when I click on the country then it loads the states for that parent country. And when I clicked on the state then it loads the city list.
I search for the plugin which suits my requirement but I fail If you know any plugin which help me then please recommend me.
Or give me some suggestion how I make this king of plugin from start.
Thanks guys,
Love WordPress.
What a great post.
I’m trying to put a Category selection list in my plugin’s options page.
I have succeeded in getting the list there, but now I need to:
a. Check the boxes of any categories that have been checked and saved for my options.
b. Get the boxes that have been checked so I can save them.
You explained well in step 6: Getting your meta box values. But, I am using the Settings API, and don’t see anywhere that I can “intervene” and munge out those settings to have the SAPI save away.
I hope this makes sense. Anyway, great stuff on your site, I appreciate it.
Hello Paul,
Do you mean you have added your own plugin page to the Settings menu? Or are you trying to expand an existing Settings page?
I usually just add my own options page. In that case, I just set my form action to “”, and do the $_POST argument extraction and saving at the beginning of the page.
Thank you for this.
Very wicked awesome.