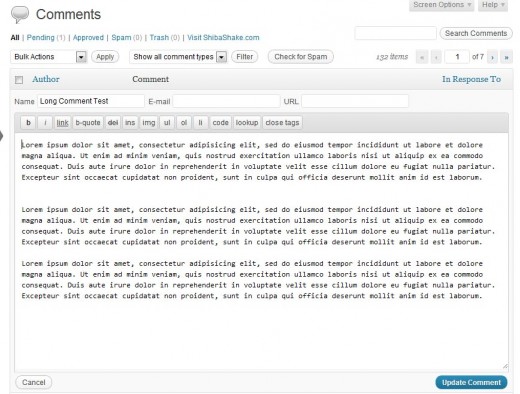
Here, we consider how to expand the quick edit menu on our WordPress comments list screen.
This earlier tutorial deals with how to expand the edit single comment screen.

1. Expand the Quick Edit Menu Interface
We can add elements into the comments quick edit menu by hooking into the wp_comment_reply filter. This filter allows us to replace the existing menu with our own creation.
However, since we only want to insert a few new elements, and keep the rest of the interface intact, we start by copying over the HTML code from the current menu. The HTML code can be found in the wp-admin/includes/template.php file, in the wp_comment_reply function.
After we reproduce the default menu, then we can add in or change whatever elements that we want.
add_filter( 'wp_comment_reply', 'my_quick_edit_menu', 10, 2);

// Render our own comments quick edit menu
function my_quick_edit_menu($str, $input) {
	extract($input);
	$table_row = TRUE;
	if ( $mode == 'single' ) {
		$wp_list_table = _get_list_table('WP_Post_Comments_List_Table');
	} else {
		$wp_list_table = _get_list_table('WP_Comments_List_Table');
	}


	// Get editor string
	ob_start();
    	$quicktags_settings = array( 'buttons' => 'strong,em,link,block,del,ins,img,ul,ol,li,code,spell,close' );
	wp_editor( '', 'replycontent', array( 'media_buttons' => false, 'tinymce' => false, 'quicktags' => $quicktags_settings, 'tabindex' => 104 ) );
	$editorStr = ob_get_contents();
	ob_end_clean();


	// Get nonce string
	ob_start();
	wp_nonce_field( "replyto-comment", "_ajax_nonce-replyto-comment", false );
        if ( current_user_can( "unfiltered_html" ) )
		wp_nonce_field( "unfiltered-html-comment", "_wp_unfiltered_html_comment", false );
	$nonceStr = ob_get_contents();
	ob_end_clean();


	$content = '<form method="get" action="">';
	if ( $table_row ) :
		$content .= '<table style="display:none;"><tbody id="com-reply"><tr id="replyrow" style="display:none;"><td colspan="'.$wp_list_table->get_column_count().'" class="colspanchange">';
	else :
		$content .= '<div id="com-reply" style="display:none;"><div id="replyrow" style="display:none;">';
	endif;

	$content .= '            <div id="replyhead" style="display:none;"><h5>Reply to Comment</h5></div>
            <div id="addhead" style="display:none;"><h5>Add new Comment</h5></div>
            <div id="edithead" style="display:none;">';

	$content .= '
                <div class="inside">
                <label for="author">Name</label>
                <input type="text" name="newcomment_author" size="50" value="" tabindex="101" id="author" />
                </div>

                <div class="inside">
                <label for="author-email">E-mail</label>
                <input type="text" name="newcomment_author_email" size="50" value="" tabindex="102" id="author-email" />
                </div>

                <div class="inside">
                <label for="author-url">URL</label>
                <input type="text" id="author-url" name="newcomment_author_url" size="103" value="" tabindex="103" />
                </div>
                <div style="clear:both;"></div>';

		// Add new quick edit fields
	$content .= '                <div class="inside">
                <label for="comment-post-id">Post ID</label>
                <input type="text" id="comment-post-id" name="shiba_comment_post_ID" size="50" value="" tabindex="103" />
                </div>

                <div class="inside">
                <label for="comment-parent">Parent ID</label>
                <input type="text" id="comment-parent" name="shiba_comment_parent" size="50" value="" tabindex="103" />
                </div>

                <div class="inside">
                <label for="comment-author-ip">IP</label>
                <input type="text" id="comment-author-ip" name="shiba_comment_author_IP" size="103" value="" tabindex="103" />
                </div>
                <div style="clear:both;"></div>

            </div>
            ';

	// Add editor
	$content .= "<div id='replycontainer'>\n";
	$content .= $editorStr;
	$content .= "</div>\n";

	$content .= '
            <p id="replysubmit" class="submit">
            <a href="#comments-form" class="cancel button-secondary alignleft" tabindex="106">Cancel</a>
            <a href="#comments-form" class="save button-primary alignright" tabindex="104">
            <span id="addbtn" style="display:none;">Add Comment</span>
            <span id="savebtn" style="display:none;">Update Comment</span>
            <span id="replybtn" style="display:none;">Submit Reply</span></a>
            <img class="waiting" style="display:none;" src="'.esc_url( admin_url( "images/wpspin_light.gif" ) ).'" alt="" />
            <span class="error" style="display:none;"></span>
            <br class="clear" />
            </p>';

        $content .= '            <input type="hidden" name="user_ID" id="user_ID" value="'.get_current_user_id().'" />
            <input type="hidden" name="action" id="action" value="" />
            <input type="hidden" name="comment_ID" id="comment_ID" value="" />
            <input type="hidden" name="comment_post_ID" id="comment_post_ID" value="" />
            <input type="hidden" name="status" id="status" value="" />
            <input type="hidden" name="position" id="position" value="'.$position.'" />
            <input type="hidden" name="checkbox" id="checkbox" value="';

	if ($checkbox) $content .= '1'; else $content .=  '0';
	$content .= "\" />\n";
        $content .= '<input type="hidden" name="mode" id="mode" value="'.esc_attr($mode).'" />';

	$content .= $nonceStr;
 	$content .="\n";

	if ( $table_row ) :
		$content .= '</td></tr></tbody></table>';
	else :
		$content .= '</div></div>';
	endif;
 	$content .= "\n</form>\n";
	return $content;
}
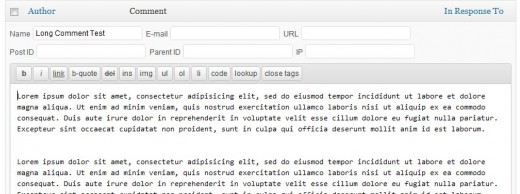
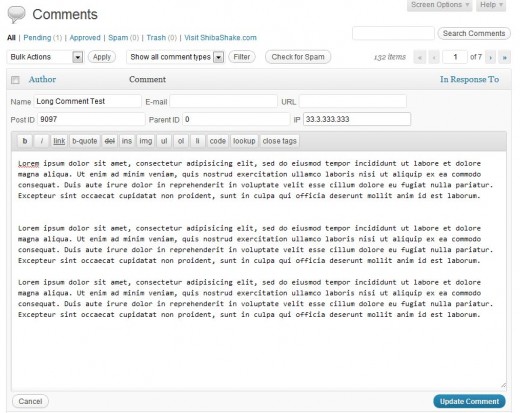
Lines 60-79 are our added comment fields. All the rest is from the existing quick edit menu. Below is our expanded menu, in particular, Post ID, Parent ID, and IP input boxes have been added.
Note that the fields are all currently empty. To fill our new fields, we must include the appropriate data in the comments list table, and then extract those values using javascript when the Quick Edit button is pressed.

2. Populate Our New Quick Edit Menu Fields
To populate our new fields, we need to do 3 things –
- Include the relevant data in each row of the comments list table.
- Extract the relevant values using javascript and put them into the appropriate fields.
- Tie our javascript code to the comments Quick Edit button.
a) Include the relevant data
We can add new data into the comments list by hooking into the comment_text filter. In this case, we are not using the filter to change the comment text, but rather to generate new data at the right place.
add_filter( 'comment_text', 'my_menu_data', 10, 2);

function my_menu_data($comment_text, $comment ) {
	?>
        <div id="inline-xtra-<?php echo $comment->comment_ID; ?>" class="hidden">
		<div class="comment-post-id"><?php echo esc_attr( $comment->comment_post_ID ); ?></div>
		<div class="comment-parent"><?php echo esc_attr( $comment->comment_parent ); ?></div>
		<div class="comment-author-ip"><?php echo esc_attr( $comment->comment_author_IP ); ?></div>
        </div>
        <?php
	return $comment_text;
}
Line 5 – Set the visibility of our data to hidden so that it does not clutter up the commments list table.
Lines 6-8 – Add the comment-post-id, comment-parent, and comment-author-ip to each comment row in the table. This corresponds to our three new quick edit menu fields.
b) Extract the relevant values using javascript
The javascript code below was adapted from the existing quick edit menu code in wp-admin/js/edit-comments.js.
// Add quick edit javascript to the page footer
add_action('admin_footer', 'my_quick_edit_javascript');

function my_quick_edit_javascript() {
?>
	<script type="text/javascript">
	function expandedOpen(id) {
		editRow = jQuery('#replyrow');
		rowData = jQuery('#inline-xtra-'+id);
    		jQuery('#comment-post-id', editRow).val( jQuery('div.comment-post-id', rowData).text() );
     		jQuery('#comment-parent', editRow).val( jQuery('div.comment-parent', rowData).text() );
    		jQuery('#comment-author-ip', editRow).val( jQuery('div.comment-author-ip', rowData).text() );
	}
	</script>
   <?php
}
Line 8 – Retrieve the quick edit menu div (#editRow).
Line 9 – Retrieve the current row being edited (#rowData). Note that inline-xtra-‘+id should correspond to the div name specified in our my_menu_data function.
Lines 10-12 – Extract values from the current row being edited (#rowData) and insert it into our quick edit menu (#editRow).
c) Tie our javascript to the Quick Edit button
Finally, we need to call our expandedOpen javascript function when the Quick Edit button is pressed.
add_filter( 'comment_row_actions', 'my_quick_edit_action', 10, 2);
function my_quick_edit_action($actions, $comment ) {
global $post;
$actions['quickedit'] = '<a onclick="commentReply.close();if (typeof(expandedOpen) == \'function\') expandedOpen('.$comment->comment_ID.');commentReply.open( \''.$comment->comment_ID.'\',\''.$post->ID.'\',\'edit\' );return false;" class="vim-q" title="'.esc_attr__( 'Quick Edit' ).'" href="#">' . __( 'Quick Edit' ) . '</a>';
return $actions;
}
On line 5 we added –
commentReply.close();expandedOpen('.$comment->comment_ID.');
to the onclick event.
- commentReply.close() ensures that a previously opened quick edit menu is properly closed.
- expandedOpen calls our own javascript code to fill in the values of our extra quick edit menu fields.
3. Save New Field Values
To save the values of our new fields, we hook into the comment_save_pre filter, just as we did when adding a metabox to the Edit Comment screen.
4. Only Add Our Code to the Comments List Screen
Since we are only expanding the comments Quick Edit menu, we want to limit the scope of our code to only this screen.
It is generally a good idea to tighten the scope of our functions so that there is less risk of unintended side effects, or conflicts with other plugins.
// Add to the admin_init function
add_filter('current_screen', my_check_screen );

function my_check_screen($screen) {
	if ($screen->id == 'edit-comments') {
		add_filter( 'wp_comment_reply', 'my_quick_edit_menu', 10, 2);
		add_filter( 'comment_text', 'my_menu_data', 10, 2);
		add_filter( 'comment_row_actions', 'my_quick_edit_action', 10, 2);
		add_action('admin_footer', 'my_quick_edit_javascript');
	}
        return $screen;
}
Line 5 – Check that we are on the comments list screen (edit-comments).
Lines 6-9 – Only include the necessary quick edit menu filters and actions when we are on the comments list screen.
If we want to add our expanded Quick Edit Menu functionality to other screens, then we simply expand our condition check on line 5. For example, we may replace line 5 with –
if (in_array($screen->id, array('edit-comments','post')) ) {
This will add the expanded functionality to the edit-comments as well as edit post screens.
WordPress 3.5
As of WordPress 3.5, the current_screen filter no longer gets called when making asynchronous (e.g. AJAX) calls to the server. Therefore, we also need to add our quick edit actions and filters to the appropriate ajax calls.
		if (defined('DOING_AJAX')) {
			add_action('wp_ajax_edit-comment', 'my_check_screen', 1);
			add_action('wp_ajax_replyto-comment', 'my_check_screen', 1);
			add_action('wp_ajax_get-comments', 'my_check_screen', 1);
		} else {
			add_filter('current_screen', 'my_check_screen' );
		}
Our new my_check_screen function will look like this –
	function my_check_screen($screen) {
		if (defined('DOING_AJAX') ||
			isset($screen->id) && in_array($screen->id, array('edit-comments','post', 'page', 'gallery')) ) {
			add_filter( 'wp_comment_reply', 'comment_quick_edit', 10, 2);
			add_filter( 'comment_text', 'get_current_comment', 10, 2);
			add_action('admin_footer', 'quick_edit_javascript');
			add_filter( 'comment_row_actions',  'quick_edit_action', 10, 2);
		}
		return $screen;
	}
5. We Are Done!
Enjoy your new expanded quick edit menu.

I was looking for a tut just like this – you always seem to have what I’m looking for 🙂 What if I want to save a user-defined field? Would that be as easy as including a field for it with my custom ID and then saving it? For instance, instead of comment-post-id, could I use my-custom-comment-id?
Sounds like it should work, as long as the value(s) are properly saved and retrieved to populate the new fields.